
 Deutsch
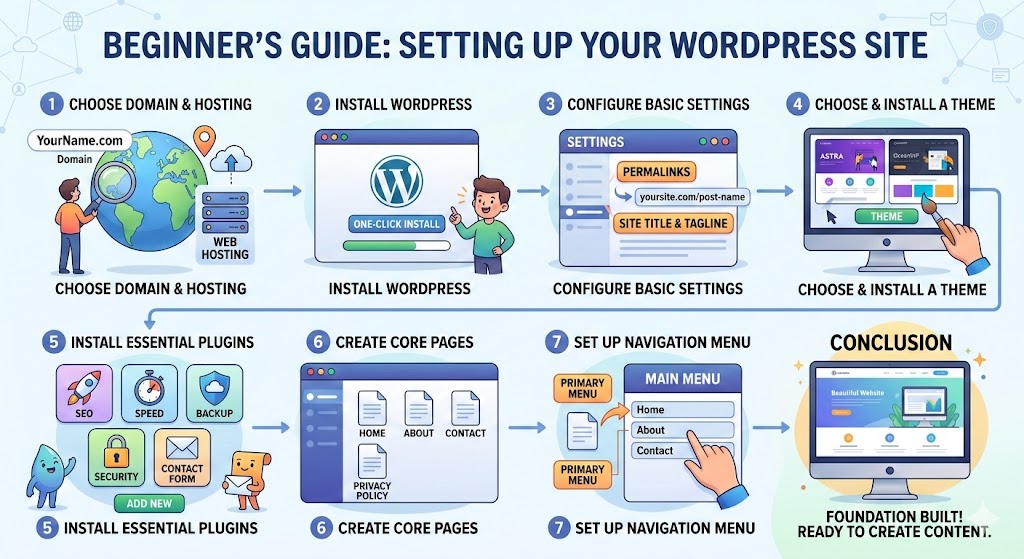
How to Set Up WordPress: A Comprehensive Step-by-Step Guide for Beginners
Starting a website can feel like a daunting task, but with WordPress, the process is more accessible than ever. Powering over 40% of all websites on the internet, WordPress is the most popular Content Management System (CMS) in the world. Whether you’re looking to start a blog, a business site, or an e-commerce store, this guide will walk you through the entire setup process from scratch.
Step 1: Choose Your Domain Name and Hosting
Before you touch the WordPress software, you need two things: a Domain Name and Web Hosting.
- Domain Name: This is your website’s address on the internet (e.g., www.yourbrand.com). Try to keep it short, memorable, and related to your niche.
- Web Hosting: This is the engine that keeps your site live. Think of it as the digital real estate where your website files live.
Popular beginner-friendly hosting providers include Bluehost, SiteGround, and HostGator. Most of these providers offer a free domain for the first year and a simple “One-Click Install” for WordPress.
Step 2: Install WordPress
Once you’ve signed up for a hosting plan, you need to install WordPress. Most modern hosts provide an automated installer in their control panel (cPanel or a custom dashboard).
- Log in to your hosting account.
- Look for the “Install WordPress” or “Softaculous Apps Installer” icon.
- Follow the prompts: choose your domain, set your site title, and create an Admin Username and Password.
- Click “Install.” Within minutes, your site will be ready!
Step 3: Familiarize Yourself with the WordPress Dashboard
To access your site’s backend, go to yourdomain.com/wp-admin and log in with the credentials you just created. This is your command center.
- Posts: Where you write and manage blog articles.
- Media: Where you upload images, videos, and files.
- Pages: For static content like “About Us” or “Contact.”
- Appearance: Where you change the design and layout.
- Plugins: Where you add extra features and functionality.
Step 4: Configure Essential SEO Settings
Before you start adding content, you need to optimize your settings for search engines and user experience.
Set Your Permalinks
Go to Settings > Permalinks. By default, WordPress uses a URL structure that looks like ?p=123. Change this to “Post name”. This makes your URLs look cleaner (e.g., example.com/how-to-setup-wordpress) and helps your SEO ranking.
Publicity Settings
Ensure that the box “Discourage search engines from indexing this site” under Settings > Reading is unchecked once you are ready for the world to see your site.
Step 5: Choose and Install a Theme
The theme dictates the visual appearance of your site. WordPress offers thousands of free themes in its directory.
- Go to Appearance > Themes > Add New.
- Browse categories or search for specific keywords like “minimalist,” “portfolio,” or “business.”
- Click Install and then Activate.
For more advanced customization, you might consider premium themes like Astra, Divi, or GeneratePress.
Step 6: Install Essential Plugins
Plugins are like apps for your website. They extend the functionality without requiring you to write code. Here are four must-haves for beginners:
- Yoast SEO or Rank Math: To help your site rank higher in Google search results.
- WPForms: To easily create a contact form.
- Wordfence Security: To protect your site from hackers and malware.
- WP Rocket or W3 Total Cache: To improve your site’s loading speed.
Step 7: Create Your Core Pages
Every website needs a few fundamental pages to appear professional and trustworthy:
- Homepage: The first thing people see.
- About Page: Who you are and what you do.
- Contact Page: How people can reach you.
- Privacy Policy: A legal requirement in most regions.
Conclusion
Setting up WordPress is a journey, not a one-time event. Now that you have the foundation laid—hosting, theme, and essential settings—you can focus on what really matters: creating great content and growing your audience. Don’t be afraid to experiment with different layouts and plugins to find what works best for your brand.


